Buckeye Mountain BBQ
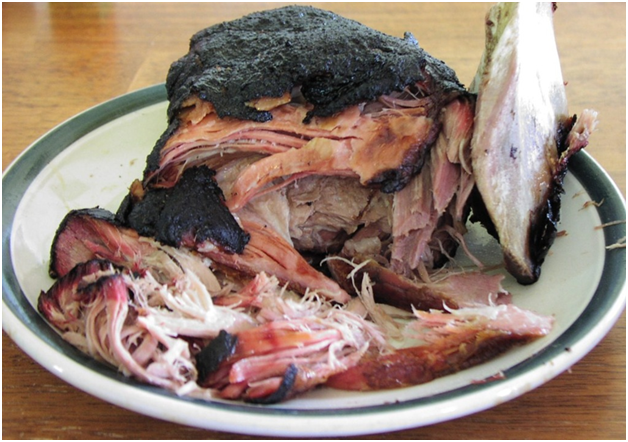
Pulled Pork
In most barbeque contests we cook Beef Brisket, Pork Ribs, Chicken, and Pork Shoulder.
Entries for the pork category include pork shoulder that has been pulled, chopped, chunked, sliced, or a combination of these.
Today, you can find a pulled pork sandwich just about anywhere in the country, but it all started back on the east coast. Hernando De Soto brought 13 pigs with him to Tampa Bay Florida in 1539. When he died in 1542 in what is now the Arkansas/Louisiana area, he owned 700 pigs. I guess you could call him the “Johnny Appleseed” of pork. Pigs became the meat of choice in the southern United States over time. The rich folks would eat “high off the hog”, meaning they would consume the best cuts from the top of the pig. The bottom of the pig was left to us poor folks. I’d like to thank those rich folks because the left us my favorite parts of the hog; the belly (bacon), spare ribs, shoulder, and whatever else that’s left-over for making sausage.
Sauces in the Carolinas include a vinegar/pepper sauce in the east, a vinegar/tomato in the west, and a mustard sauce in the south. The pork is cooked high over coals and a lot of shoulders are used. Some places still cook the whole hog. The meat is chopped and the vinegar sauce is usually added to it for flavor and moisture. As you travel west, the sauce gets sweeter and the pork is usually pulled or shredded instead of chopped.
Here is a recipe for you from Chris Lilly. Chris is the head cook at Big Bob Gibson’s bbq restaurant. Start with a pork butt.
Chris Lilly’s Six-time World Championship Pork Shoulder
Recipe By: Chris Lilly of Big Bob Gibson’s
For the pork butt rub:
1/4 cup dark brown sugar
1/2 cup white sugar
1/2 cup paprika
1/3 cup garlic salt
1/3 cup kosher salt
1 tablespoon chili powder
1 teaspoon oregano leaves
1 teaspoon cayenne pepper
1 teaspoon ground cumin
1 teaspoon black pepper
Pork injection:
3/4 cup apple juice
1/2 cup water
1/2 cup sugar
1/4 cup salt
2 tablespoons Worcestershire
Inject pork evenly with injection solution. Apply a generous amount of rub onto meat. Pat so the rub will adhere. Place in a smoker and cook with indirect heat for 16 hours on 225°F. Serve with sauce on the side or paint shoulder with sauce the last 20 minutes of cooking. When done, the pork should pull off the bones easily. The internal temperature of the pork should reach 195°F to 205°F.
If you don’t have a meat thermometer, you can tell when the pork is done by pulling out the blade bone (shown on the right in this picture). The pork is ready when this bone comes out easily and clean.
If you don’t have the time to tend the pit for half the day, start early, smoke the pork for 3 hours or so then, put it in your oven at 250 to finish it off. If I’m serving pork butts for an event, often I’ll smoke it for 4 hours the evening before the event, then, I’ll set the oven to 200 degrees and let the meat cook over night. It turns out great.
I highly recommend ordering some sauce called Blues Hog Tennessee Red for your pulled pork sandwiches. Use it straight or mix it with your favorite sweet sauce. You can order it from The Kansas City BBQ Store. http://www.thekansascitybbqstore.com/
As always, if you have any questions, just shoot me an email, dbrewer@buckeyemountain.com
Beef Steak Discussion
If you had only one meal left to eat on this earth, what would it be?
For me, a beef steak dinner would have to be it. It’s really one of the easiest things to cook.
Finding a steak worth buying is a bit harder. The same factors apply when picking out a steak or choosing a brisket. Look for hard white fat with lots of marbling. Choice or prime is best for grilling beef.
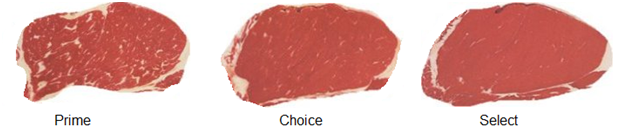
The grade is determined by the cow’s age and the amount of marbling in the muscle. The flavor of beef comes mostly from the fat, so look for a steak with lots of it. Tenderness in a steak is determined mainly from where on the animal it comes from. Leg, chest, and shoulder muscles are heavily exercised. The muscles on top (rib and back sections) are mostly just along for the ride. They don’t get much of a workout. This is where we get the tenderloins, t-bones, porterhouses, rib-eyes, etc. Since they don’t get much work, they do not develop into tough cuts like briskets (the chest). There are several ways of cooking steaks. There’s the reverse-sear, traditional method, hot-tubbing method, dirty method, etc.
I think one of the most important things to understand when cooking meat is what I call temperature shock. Take a cold cut of meat and expose it to a high temperature and one of the first things that happens is, the muscle fibers begin to contract (shrink). A muscle is made up of lots of long bundles of fibers surrounded by connective tissue (collagen). The interior of the fibers is where most of the water is stored. The more water in the fibers, the juicier the meat. The last thing we want to do is squeeze out the juices. Have you ever tossed a thin pork chop or a slice of bologna into a hot pan? If you have, you’ve seen it curl up pretty quickly. This is the reaction to high heat contracting the fibers. The same thing happens to a steak or a brisket. That’s one reason we barbeque briskets low and slow. And that’s something that we need to keep in mind when cooking our steaks.
Another important step in making a good steak is letting it rest after grilling it. When the contraction of the meat begins, it starts from the surfaces that are exposed to the heat source, and this starts to squeeze the water towards the center of the steak. Once the steak is done, a lot of the juice is concentrated in the center of the meat. Cut into it right off the grill and much of the juice will end up on the plate. Let the meat rest, the fibers loosen up; the juice is then redistributed back into the entire steak. Give it five minutes and your steak will be more tender and juicier.
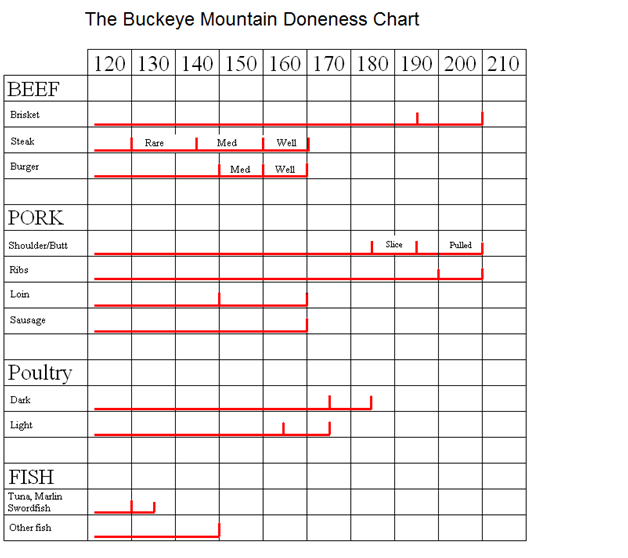
Below is a chart that has some internal doneness temperatures. Remember also that there will be some carry-over cooking taking place once the meat is removed from the grill. The temp may rise a few degrees while resting, so remove the steak a few degrees short of your desired temperature.
Hot Tub Steak
This method works well for thick steaks, 1 ½ to 2 inches. Seal your steak in a plastic Ziploc bag. Put it into a bowl and fill the bowl with hot tap water. Leave it in the hot water for at least ½ hour, adding more hot water every ten minutes. While the steak is warming up in the water, get a bed of coals going, two to three layers deep. You want a hot fire. When the coals are ready, season your steaks and move them to the grill. Turn the steaks using a set of tongs (don’t use a fork) once every 60 seconds until the internal temperature is 125 degrees for a med-rare steak. Remove the steak and cover it with foil for 5 minutes before cutting into it.
Sear and Dwell
Put the steak over a hot fire. Turn it over when it has the amount of color you like
(maybe around 90 seconds) and remove it from the pit when the other side is seared to your liking. You now have a seared steak that’s still raw in the middle (unless it’s a very thin steak). You now want to cook the steak at a lower temperature so it doesn’t tighten up and the outside doesn’t get overdone. You can choke down the fire in your pit to get the temperature down to around 300, or, finish it in an oven until it reaches the desired internal temperature.
Reverse sear
The same as above except reverse the order. Cook low and slow, around 200 until the internal temp is around 110 deg. You can add some smoke to the steak with this method. Throw on a wood chunk or chips. Once you’re at 110, remove the steak and foil it up. Get the pit going as hot as you can, remove the foil and sear the meat on both sides, turning every 60 seconds until it at your desired internal temperature.
Traditional Method
I competed a few times against a bbq’er from New York. His name was Adam Perry Lang. I had heard that he won an award for being the best steak cook in the city. The strange thing is that he cooked the steaks in a strip club called The Penthouse Executive Club. Dinner and a floor show, nice. I asked him what method he used to cook his steaks. He said he turns them four times. No sear and dwell, no hot tubs. A lot would depend on how thick the steak is and the doneness you want. At home I’ve had good luck turning every 90 seconds until it’s done. Adam now runs a few BBQ joints in New York, London, and Vegas I think.
Dirty Method
I sometimes do this in the winter when I’ve got a good bed of coals going in the fireplace. Simply toss the steak into the fire, right onto the coals. Turn it a few times (use really long tongs) and brush off the ashes when you pull it out. Not many stick to the meat. Saves you from cleaning a cooking grate and impresses the heck out of your dinner guests.
Cooking times will depend on how thick the meat is and the starting temperature of your steak.
If you only remember three things, make them these:
- Let the steak come up to room temperature before you start (Set it on the counter for an hour).
- Get a good meat thermometer and check the calibration. (More on this next time)
- LET THE STEAK REST FOR AT LEAST 5 MINUTES BEFORE CUTTING INTO IT.
Brisket – One Tough Hombre
Back in the old days, they used to boil it into submission. It wasn’t fit for the grill. People would grind them up for burger or sell it for stew meat. In Ireland as far back as the 1600’s, they would “corn” it (let it cure in salt for a few days) before they boiled it. More recently, a German butcher in Texas tossed a brisket into a smoker that he used for smoking sausages and Texas BBQ Brisket was born.
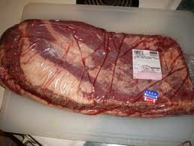
When selecting a brisket for bbq, you should try to find what’s called a “packer cut”. This will have two large muscles separated by a layer of fat and comes vacuum sealed in cryovac.
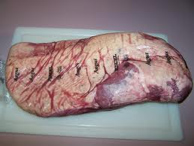
Here’s the top of a brisket in cryovac. The “point” is on the right side, the “flat” is under the fat on the left side.
This is the bottom of the brisket. The “flat” is now on the right side of the pic.
Here in Kansas City, you can get them at Sam’s Club or Costco. DO NOT BUY A TRIMMED BRISKET. You will need the fat left on to protect the meat. Don’t worry about your diet; you’ll trim off the fat after the brisket is cooked. Beef is graded by quality. Prime is best, choice is next, then comes select. Most of the beef you buy in grocery stores is select beef. Most of the prime beef is sold to restaurants or shipped to Japan. They like beef a lot over there. They’ve been eating nothing but fish and pickled vegetables for thousands of years. The Sam’s and Costco sell choice beef here. Try to find choice if you can. If you can’t, select will do. Look for a brisket with hard, white fat and as much marbling as you can get. Cooking is pretty simple. Trim the fat side down leaving about ½ inch of fat on top. Rub some oil or a thin layer of mustard all over, top, bottom, and all sides. Sprinkle heavily with bbq rub. You can leave it marinate in this rub overnight for more flavor if you like. Get your pit going at 250 degrees with a few wood chunks. Put the brisket on fat side down. Leave the exhaust open; adjust your temp where the air comes in. After four hours into the cook; spray with apple juice every half hour. The hardest part of cooking a brisket is keeping your pit temp up for the length of the cook. Depending on the size of the brisket, it can take anywhere between 10 and 16 hours. You can add a few wood chunks every hour or so during the cook for smoke flavor.
When is it done?
Take your meat thermometer and check the internal meat temperature in the center of the flat after 8 hours into the cook. It will read anywhere from 150 to 170. The brisket will be done at around 200 degrees internal. You will just check it every 30 minutes or so towards the end of the cook. WARNING: If you check the temp during the cook and come back two or three hours later and it still reads the same temperature, do not panic. After you place your brisket on the pit, it will increase from room temperature to around 160 degrees (plus or minus 10 degrees or so) in three to four hours. Then the temperature will get “stuck” in what we call a plateau. This is normal. Nothing is wrong with your pit. Just keep it at 250 degrees and after another four or five hours, the temperature will start to climb again. There is no “perfect” done temperature. I always go by feel. At 190 degrees, take your meat thermometer or a metal skewer or something similar, and insert it into the center of the brisket flat from the top. There will be some resistance going in and as you pull it out, the brisket will lift off the grill slightly. The longer you cook it, the easier it will slide in and out until at some point it will slide in easily and the brisket will not ”hold on” as you pull it out. Sounds a little complicated, but once you do it, it will be obvious. The “done” temperature will vary slightly, but it’s usually around 200 to 205 degrees. This will give you brisket that you can slice thick like we do in competitions. For slicing thin and piling high on a sandwich, I would take the brisket off a little early. Some restaurants will stop cooking at around 180 to 190 degrees. That way the meat won’t fall apart as they run it across a meat slicer. But they slice very thin so it is easy to chew.
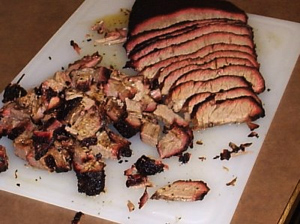
Here’s the “point”, chopped into Burnt Ends on the left and the “flat” sliced up on the right.
Now that the brisket is off of the pit, let it rest for a half an hour, then turn it fat side up and trim the fat off. The flat and the point can be separated now. Just find the fat layer between the two and run a knife through it. Scrape all of the fat off of the separated flat and point. Slice the flat across the grain to make sandwiches.
Kansas City Burnt Ends
Put the point back on the pit (I like to put it in a hot spot if I have one) for another hour. Then cut the point into 1 inch cubes and eat them.
Or, you can cut up the point into 1 inch cubes, sauce up the cubes, then put them back on the pit in a pan and smoke them for a couple of hours.
Note: If you don’t want to run a pit for 10 to 16 hours, you can smoke the brisket for four or five hours, then finish it in an oven set at 210 degrees overnight.
This is for Jim over at UP.
How to turn your gas grill into a smoker.
Buy an aluminum foil roasting pan. Put it under the cooking grate of your grill.
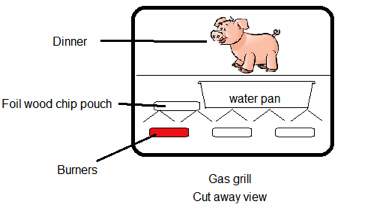
Fill it halfway up with water. Soak some wood chips for an hour. Wrap up a handful of chips in aluminum foil and put it on the burner next to the pan. Poke a few holes in the foil pouch to let some smoke escape. Turn your gas (ugh) on as low as it will go. You might just use one burner. You’re looking for around 250 degrees. Put your meat on above the water pan. Replace the foil pouch with another when there is no more smoke coming out of it.
Remember … If you have any BBQ questions, you can email me at: dbrewer@buckeyemountain.com