Ribs
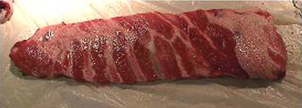
Around here (Kansas City), ribs are almost always pork ribs. There are usually three different types of pork ribs that you can get at the store. Spare ribs are the largest and come from the rib cage section that is joined at the breastbone of the pig. Back or loin ribs are cut off of the spine and are the top half of the hog’s rib cage. Where the rib cage joins up with the shoulder, there are a few very short ribs that butchers leave some extra meat on and they call them Country Style Ribs. If these tricky butchers keep the band saw running and cut up the shoulder into strips, they will package these as country style ribs also. They are not ribs at all but are still good eating. Here are some country styles.
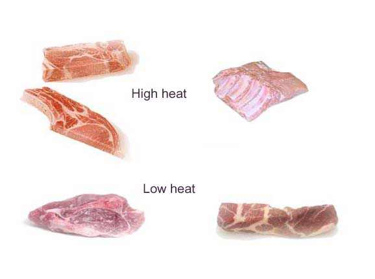
If your country ribs look similar to the top three, they are great grilled for about 45 minutes. The shoulder cuts (bottom two examples) are best if slow cooked, around 3 hours at 250 degrees.
When buying spare or back ribs, look for slabs that have no bone showing on top. We call these “shiners”. If the slabs come in cryovac, a little fluid in the package is OK but there should not be any bubbles in the fluid. This means that the bacteria is multiplying at a pretty good rate and the meat is well on the way to being spoiled. If I buy any meat that was wrapped in a supermarket in those little trays with thin plastic, I always pop a hole in the plastic and smell it. If it smells OK, (there should be almost no odor in fresh pork) I buy it. If it stinks I give it to the butcher and tell him it’s going bad. If he’s honest, he appreciates it. If he’s not honest, he waits until I’m gone, calls me an ass@#$% and re-wraps it to sell to someone else. Just a word here about an alarming trend in the meat industry, meat producers have been slowly introducing meat that has been pumped full of saltwater. It’s common now in the poultry and pork industries and is working its way into the beef markets. The next time you buy meat, check the label, it might say “Flavor enhanced or Tenderness guaranteed, or Moistness enhanced”.
The manufacturers inject a solution of sodium phosphates and water and various other chemicals into meat. I’ve seen it as high as 12 percent. So you are usually getting 90 percent meat and 10 percent salt water. They make more money because water is cheaper than meat, and the meat can stay on the grocery shelves longer because it is a way of preserving meat. The grocers have less waste. Just remember this…MEAT SHOULD NOT HAVE AN INGREDIENTS LIST!!!!! It makes me an angry repair guy. If you can only get enhanced meat you may want to cut back on your salt in your rub recipe.
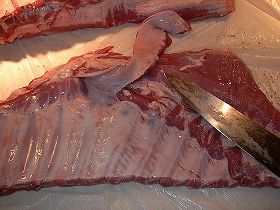
Today we’re going to make some spare ribs. Lay your slab bone side up.
Cut off the little flap of meat that runs across the slab.
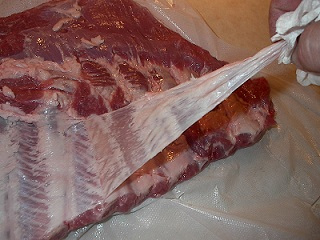
Take the handle of a spoon and shove it between the membrane and one of the bones, then
pry the membrane up until you can grip it with a paper towel then pull the membrane off.
Now, square the slab up by cutting off the tips of the ribs like below.
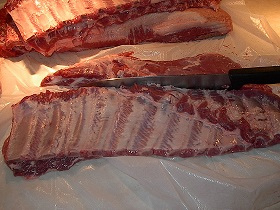
Turn the slab over and you have what we call a St. Louis cut.
Take a little oil and rub the slab with it. You want to make a surface that the rub will stick to. Some people like a little mustard for this step. It makes good glue and you won’t taste the mustard after it’s cooked.
Basic BBQ Rub
1 cup brown sugar
1/3 cup your favorite seasoned salt
2 T. paprika
1 T garlic powder
1 T onion powder
1 T black pepper
1 T chili powder
1 tsp lemon pepper
2 tsp cumin
1 tsp cayenne
This is a basic BBQ rub that I would use on most meats. You can change it up to suit your own taste. For example, for pork, I would add more cumin, for brisket I might add celery salt or ground celery seed. For chicken, I’d add rosemary or thyme, sage, or whatever I liked. I like a little allspice in my rib rub. Try it out, then, play with it. Everyone has different tastes. Sprinkle the rub on the slab, top and bottom so it’s well covered. The longer the rub sets on the meat, the more flavors you will get into the meat’s interior. I like to let it marinate in the rub for about an hour to overnight. Get a good bed of coals going, then add some wood. I use a ratio of about 90 percent charcoal (briquettes, lump, or coals from wood) to 10 percent seasoned wood chunks or logs. In a small backyard pit, two or three wood chunks the size of your fist will be enough to start. Set up your pit for indirect cooking and shoot for a temperature range between 250 and 275 degrees F. Now your pit is around 250 and you are set up for indirect cooking with just a wisp of smoke coming out of the exhaust. Slap them ribs on, bone side down or place them in a rib rack. Let them cook for about two hours so that the rub sets up and the ribs start to look a little dry. At this point you need to decide if you are a sprayer, or a baster. Some like to make up what is called a mop. It’s a liquid baste that is mopped on during cooking to help keep the meat from drying out and add a little extra flavor. You can find lots of mop recipes on the internet. I am a sprayer. I like to fill a spray bottle with apple juice and spray the ribs every 20 minutes. The water in the juice helps moisture retention and the sugar in the juice helps form a nice bark, or crust, on the meat. I like to turn the ribs every once in a while to spray the bottom also.
Depending on whether you bought spare ribs or back ribs, they will take from four to six hours to cook. If you cook a slab of back ribs that runs about 2 to 3 pounds it may take around four hours. A big old five pound slab of spares will take a longer. The one thing that will separate you from the pack of backyard cooks is the ability to tell when the meat is done.
Method 1
After 3 hours into the cook, grab the slab with your tongs halfway up the slab so that you are holding it from one end. Notice how the end that hangs down is stiff. As you get towards the end of the cook, there will be less bounce as you pick the slab up. The slab is done to perfection when you pick up the slab this way and the end will droop and you see the meat start to develop a crack as the meat pulls away from the bone at the end of the tongs. The tissues that bind the meat to the bone have finally broke down.
Method 2
Take a toothpick and poke the ribs between the bones. Do this a few times while you are spraying towards the end of the cook. You can feel the resistance the meat offers as you slide the toothpick in and out. As you get closer to the end of the cook, the resistance will decrease. When the ribs are done, there will be very little resistance. It will feel like going into warm butter.
Method 3
Get a meat thermometer and pull the ribs off at 205 degrees F. and make sure the thermometer is accurate. Check it in boiling water. Get a pot of water to a full boil. Insert the thermometer. It should read 212 degrees at sea level.
If you want sauce you can apply it now and put the ribs back on for about 10 minutes to set the sauce up.
Jim at U.P. was asking for a few tips for using his gas grill. My neighbor invited me over to cook some ribs one weekend. He only had a gas grill. I disconnected the propane tank, built a little fire of charcoal and wood on one side of the pit and put the ribs down at the other end. It worked out quite well.